


Match-3 Level Design Principles
If you are reading this article, you likely have experience creating match-3 levels, or perhaps you are just starting your journey, or simply trying to understand how it works. I will try to make it interesting for everyone.
It’s important to note that evaluating a level as ‘good’ or ‘bad’ is subjective. It depends on the experience and mood of the evaluator. So, don’t be surprised if some people think your work is good while others think it’s bad – it’s normal to have diametrically opposed opinions. Let’s compare this process to evaluating a painting. I’ll take a simplified example: Is Malevich’s Black Square a good painting or a bad one? And would a level for Royal Match be good for Gardenscapes?
The Plan
How are levels typically created for games, like platformers or 3D shooters? They start with a concept, perhaps on paper, placing enemies or obstacles, and only then is the level assembled in an editor with primitive graphics and the gameplay is tested. Roughly the same process occurs when creating a match-3 level, except that the match-3 game editor allows (or should allow) quickly sketching out the level idea and launching it, so the designer can play it and test the gameplay. But before creating, you need to define the level’s characteristics. We call this a MasterSheet – a technical specification for a range of levels, or the distribution of elements and difficulty across levels. This is necessary so that our match-3 elements don’t disappear from the game for too long a stretch of levels, and also aren’t used too frequently.
Such a table should include:
- Level Number
- Level Difficulty
- Elements Used in the Level
- Level Type (optional)
- Level Screenshot
Sometimes, project designers want to regulate how often certain level types appear. These could be digging levels, fun levels, bonus levels with coins, tutorial levels, or even puzzle levels; many types can be defined, depending on the project. Or you can choose not to define them, leaving it to the designer’s discretion.
From my experience, overly detailed restrictions on level types do more harm than good – give designers more freedom, and they will be able to surprise you. Restrict them too much, and you’ll get uniform levels.
A simplified example of the MasterSheet
Okay, now we know what to use in the level and what its difficulty should be. Time to get started.
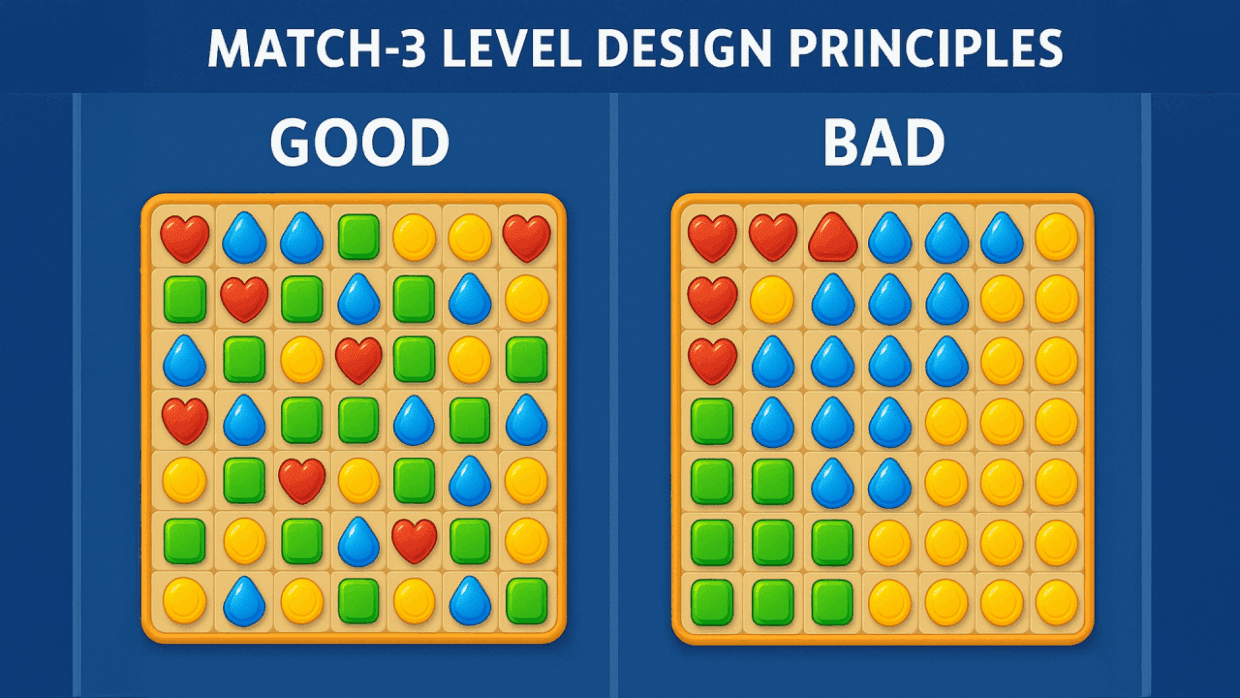
Visual Appeal
First impressions are important! You can argue with me and show your test results, but a level should be beautiful. The first thing a player sees when launching a level is the image. If your level looks sloppy, if you break the rule of symmetry, if you don’t use patterns – the level will never be visually appealing.
(Question for the attentive ones: what is the main pattern in Royal Match’s level design? Write in the comments)
I found these images of Royal Match levels on the internet. Perhaps these levels are no longer in the game or never were. Let’s take a look at them:

Visually very pleasant levels. It’s clear at first glance what needs to be done; ‘the eye rejoices’ (our internal term 🙂 ).
And two more levels:

For such levels, we use the term – ‘the eye twitches’. This is an example of how a level should not look. I haven’t played these specific levels; most likely, the gameplay is fine, but visually they look unattractive.
Should all levels be strictly symmetrical? No, you can always break the rules for the sake of gameplay. Below is an example of a level where symmetry is broken (well, almost :)), but it is still attractive, and the gameplay is well-thought-out.

Confused? Welcome to my subjective opinion. What I like, you might not, and vice versa; that’s normal.
Board Shape
There’s a simple rule: If some part of the level isn’t used, it can be cut out. Your levels shouldn’t be identical; they should differ, including in their board shape. When a player starts a new level, they shouldn’t feel like they just played the same level, even if the elements have changed; the board shape should also change.

Element Properties
Every element in your game should be distinct; it should have some special feature – it explodes, blocks, falls, rises, reacts only to color, or is cleared only by power-ups. (except in cases where your elements differ only in appearance)

As a level designer, you must consider these properties and use them. Look at the screenshot above – the acorn element will fall down, so it is placed at the top of the level. Analyze the elements available to you in a specific level. How can their properties be used? Which elements can be combined? Which elements should not be combined? You do have an element compatibility table for your project, right?
Treat each level like a mini-story. You are the designer, and you want to tell the player something, show them something, or surprise them. Come up with an idea for the level. A beautiful picture of a bunny made of elements is great, but is there gameplay behind that bunny?
Element Density on the Level
You can use just a few elements on the level and place them in the corners, make a level with many colors forcing the player to make empty matches (that don’t contribute to the goal), or you can arrange elements so that every match gives a sense of progress – clearing obstacles, removing layers from them, or generating power-ups. The choice is yours.
Difficulty
How is level difficulty determined? How many moves are in the level? How many chip colors to use? Your project should predefine what number of moves you consider normal. Remember, you need to give the player as much content as possible per unit of time. Value the player’s time; don’t force them to make 50 moves on a level. About 10 years ago, this was considered normal; now, the game conditions have changed – 15-20 moves per level is quite sufficient.
Insight: Reduce the number of moves in your initial levels and conduct an A/B test. If you do everything correctly and manage to maintain the level difficulty, the results might surprise you.
Use a combination of obstacle quantity (and their layers) and chip drop chance settings so that the level is completed within the allotted number of moves. Perhaps this is the most challenging part of the article – how to find the balance in difficulty and achieve the desired difficulty. You can make an infinitely beautiful level, but what’s the point if it can be passed in 5 moves or cannot be passed at all? If you are an experienced designer, then already at the stage of creating the level skeleton, you know roughly how many colors will be in this level and what drop chances you will configure for them – you know roughly because you will fine-tune the exact value during your level testing. You must play it, play it many times. Made a change – launch the level; another change – launch the level.
Okay, you think you’ve created an excellent level. What is its difficulty? Play the final version of your level 10 times in a row and record how many goals remain upon losing and how many moves remain upon winning. Perhaps removing 1 move will make it perfect?
It’s worth noting that the difficulty of levels in the 1-100 range is not equal to the difficulty of levels in the 1000-1100 range. Different players with different skills are found here; it’s important for you to understand this and adjust accordingly.
Remember that wins with a large number of remaining moves shouldn’t happen often, especially on difficult levels. This might indicate incorrect difficulty tuning. Likewise, losses with a large number of remaining goals are a problem in level design.
Monitor reshuffles. Two reshuffles in one attempt are a reason to think about improving the level.
Monitor progress towards goals. It shouldn’t be the case that the level goal is achieved too quickly or, conversely, only starts being achieved in the final moves (there can be exceptions determined by element mechanics).
Conclusion
Okay, the level is ready. What’s next? A mandatory rule is to let another designer play the level. It’s very good if this person is responsible for the quality of levels across the entire project. If you don’t have such a person, it can simply be your colleague. Gather feedback, make edits, or discard the level and create another one.
You have gone through all the stages of level creation, checked its difficulty; perhaps you have algorithms that allow doing this without the participation of real players. You can read more about this here. The level has become available to real players. Now you must monitor its metrics and difficulty, which should correspond to your plan. Perhaps the level causes increased player churn? I have bad news for you: you need to urgently replace/modify this level.
Making a level takes 10-20 minutes, but tuning it to its final state can take another hour. And you thought these match-3 games are made quickly? Not so fast. The devil is in the details.
If you have any questions, need consultations, or require quality levels, feel free to reach out.